Friday, 15 February 2013

SIMPLY DOING IN CorelDRAW ( part-2 )

DUPLICATING OBJECTS 

                    CorelDRAW provides several ways of copying objects : either by creating a separate copy, duplicating an existing object to a specific page location, or by creating a copy that maintains a relationship to the original.

 Duplicate Command  

                  
                     Duplicating is faster than copying and pasting. When an object is duplicated, the duplicate copy is directly placed in the Drawing window and does not use the Clipboard. To duplicate an object, select the object, and in the Edit menu, select the Duplicate option. The Duplicate Offset dialog box appears the first time you duplicate an object. In the dialog box, enter specific values in the Horizontal Offset and Vertical Offset boxes.

* If the offset values are zero, the duplicate object is placed on top of the original.
* If the offset value are positive, the duplicate object is placed above and to the right of the   original. 
* If the offset vales are negative, the duplicate object is placed below, to the left of the original.


An object can be duplicated by pressing Crtl + D. You can press Space bar or right-click while dragging an object to create a copy of that object.

Clone

                 
                 Clones create a duplicate that is linked to the original object. If you change the properties such as Fill, Outline, or Transformation of the original, the change is automatically applied to the clone. Clones are placed in the same location as a duplicate. Cloning is a powerful feature, but only few users take advantage of it. The clone command is placed in the Edit menu.
                  
                  You can also select the master object of a clone by right-clicking the clone, and selecting Select Master. Similarly, the clone objects of a master can be selected by right clicking the master, and selecting Select Clone.


Clone Fill                                              - The option restores the master fill attributes.
Clone Outline                                        - The option restores the master outline attributes.
Clone Path Shape                                  - The option restores the master shape attributes.
Clone Transformations                          - This option restores the master shape and size attributes.
Clone Bitmap Color Mask                    - This option restores the master color settings.
But you can restore only those master properties, which were changed in the clone object.

Step and Repeat

               
                 To create copies of an object at a specified position, use the Step and Repeat option. To use this, click the Step and Repeat option in the Edit menu. The Step and Repeat docker appears on the right side of the window.


Enter the appropriate values in the Number of copies box, and also in Horizontal Settings and Vertical Settings. Then click apply.


ORGANIZING OBJECTS 


Grouping and Locking Object


                 Grouping lets you group object so that they can be selected, moved and sized as a single entity. Grouping is the most used method to treat multiple objects as a single entity. In CorelDRAW you have the commands for grouping objects. In CorelDRAW, group of objects may also include lower level groups, meaning you may create groups. Along with group and ungroup commands there is one additional command called Ungroup all. This command ungroup all the nested groups in an object.
                 Only one child object may be selected at a time. You can also lock objects to your page using Lock Object command in the Arrange menu. To unlock object, choose Arrange and then the Unlock Object option. To unlock all objects, select Arrange and then the Unlock all option.

Combining Objects 


                 If two or more objects are combined, a single object with common fill and outline attributes is created. The overlapping area in this object become transparent. Rectangles, ellipse, polygons, stars, spiral, graphs, or text can be combined. CorelDRAW converts these objects to a single curve object.


You can combine objects by selecting them, clicking the Arrange option and then selecting Combine. To break apart any object, click Arrange and then select the Break Curve Apart option.

Aligning and Distributing 


                 In CorelDRAW, you can align and distribute objects in a drawing. Objects can be aligned with each other and with parts of the drawing page, such as the center, edges, and grid. When objects are aligned with objects, you can line them up by their centers or by their edges.


                  If objects are distributed, space is automatically added between them based on their width, height, and center points. You can distribute objects so that their center points or selected edges appear at equal intervals.

Snapping Objects 


                 While drawing an object, it can de snapped to another object in the drawing. Objects can be snapped to a number of snap points in the target object. The snap points is highlighted when the pointer is close to a snap point.\

To snap an object to another with greater precicion :
*  First snap the pointer to a snap point in the object 
*  Then, snap the object to a snap point in the target object.

                 In CorelDRAW, different types of snapping modes are available. These modes can be accessed from the Snap to Objects Setup View menu.              
  

* Node - Snap to an object's node.
* Intersection - Snap to geometric intersection of an object.
* Midpoint - Snaps to a line segment midpoint.
* Quadrant - Snaps to points that are at 0 degree, 90 degree, 130 degree, and 270 degree on a circle,    ellipse or arc.
* Tangent - Snaps to a point on the outside edge of an arc, circle, or ellipse where the line touches, but does not intersect the object. 
* Perpendicular - Snaps to a point on the outside edge of a segment where a line is perpendicular to the object.
* Edge - Snaps to a point, touching the edge of an object.
* Center - Snaps to the center of the closest object, that is arc , regular polygon, or curved centroid.
* Text baseline - Snaps to a point in the baseline of artistic or paragraph text

Wednesday, 13 February 2013

SIMPLY DOING IN CorelDRAW ( part-1 )

SELECTING THE OBJECTS

                   In order to change an object. it should be selected. Visible objects and a single object in a group or a nested group can be selected.Objects can also be selected in the order in which the were created. You can select all objects at once and also deselect them. When an object is selected, the property bar and the status bar displays the details of the selected object such as Size. Position, Fill and Outline.

                  The Pick tool is used to select objects.This tool is listed as the first tool in the toolbox. To select a single object, click that object using using the pick tool.To select all objects, in the Edit menu, click the select all option and then select object.
One or objects can also be selected by clicking on the pick tool and then dragging around the objects. This method is known as marquee selection.Objects should be deselected when no changes are to be made to them.To deselect the object, select the Pick tool and then click on the blank space in the drawing window.


CHANGING ORDER OF OBJECT

                 Object ordering is useful in organizing shapes. You can change the stacking order of objects on a layer by sending objects to front or back, or behind or in front of other objects. To change the order of an object, select hat object, click Arrange and then select the Order option.

Shortcuts for changing the order of objects 

To Front of page - Ctrl + Home
To Back of page - Ctrl + End
To Front of Layer - Shift + Page up
To Back of Layer - Shift + Page down
Forward one - Ctrl + Page up
Back one - Ctrl + Page down


TRANSFORMING OBJECTS 

                 Transform is simply an adjustment of an object's position, rotation, and scale. Transformation using mouse actions are much more instinctive than precision transformations, but each has its own benefits.

                 You can change the size of the object by clicking and dragging any corner handle. When the cursor is placed over any handle, it changes to two-sided arrows. Also the exact sizing can be done on the Property bar in the X and Y position boxes. Enter the desired final dimensions and the object will re-size after you hit the Enter key.


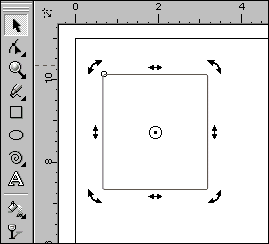
                  To rotate or skew objects you need to use a different set of handles around the objects. These handles become available after you click the selected object the second time. A single click selects the object, another click will activate the rotate and skew handles with arrows and a center circle. The rotate handles are located at the four corners and the skew handles are located in the middle. While moving the center origin, you can set the point around which objects are rotated or skewed. Property bars can also be used to rotate objects. To rotate an object using property bar, enter the degree in angle of rotation box. There is no skew control on the property bar.

Mirroring an object 

                   As the name suggests, mirroring an object, flip it from left to right or top to bottom. Here the mirror anchor point is the center of the object. This feature is set by default. You can mirror an object by selecting the object and pressing the Ctrl Key. Now drag the selection handle to the opposite side of the object. You can also have the option of selecting the Mirror Horizontal or Mirror Vertical buttons on the Property bar.

TRANSFORMATION USING TRANSFORM DOCKER 

                   Objects can also be transformed using the Transform docker. You can access this docker in the Window menu. Now, select the Dockers option and click Transformations from the list.

            For example, to position an object, click on the Position button and set the options for it. Similarly you can Rotate, Scale and Mirror, and Skew the object by selecting the appropriate button and setting the values in the docker.
            You can also open the Transformations docker by clicking Arrange, selecting the Transformations, and further selecting an option from the flyout.


Tuesday, 12 February 2013

BASIC SHAPES AND PREDEFINED SHAPES IN CorelDRAW

DRAWING BASIC SHAPES

In CorelDRAW, basic shapes can be drawn. They can also be modified by using special effects and reshaping tools.

* RECTANGLE TOOL

Rectangle tool lets you access Rectangle and 3-point Rectangle tool. In corelDRAW, rectangles and squares can be drawn by drawn by dragging diagonally with the Rectangle tool or by specifying the width and height in the property bar

A rectangle can be drawn from its center outward by holding down the Shift key as you drag. Similarly, a square can be drawn from its center outward by holding down Shift + Ctrl keys. 

A rectangle that covers the drawing page can be drawn by double-clicking the Rectangle tool.


* ELLIPSE TOOL

The Ellipse tool is used to create an ellipse or a circle. To specify the dimension of the ellipse, or a circle you can specify the width and height of the object in the property bar

The 3-point Ellipse tool grouped with the ellipse tool, is used to create an ellipse at an angle, eliminating the need to rotate the ellipse. The property of 3-point Ellipse tool are the same as those of Ellipse tool.


* POLYGON TOOL

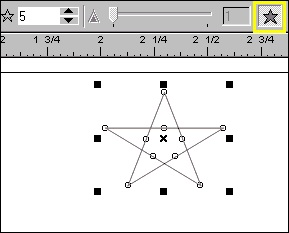
The Polygon tool helps you create perfectly formed shapes. These shapes can be edited with a special internal relationship between the number of points and length of the sides. This tool helps you draw a polygon and two types of stars that are perfect and complex. Perfect stars are normal stars with fill applied to the entire star shape. Complex stars have intersecting sides and produce original results with a fill applied.

 When the polygon tool is selected, the property bar displays polygon-specific options such as Polygon Mode, Star Mode, Number of sides or Sides of polygon, Stars and Complex star, Sharpness of Polygon Slide, and so on.


* SPIRAL TOOL

The Spiral tool can create circular-shaped paths. Spiral objects are composed of single open path that curves in clockwise or counterclockwise direction..The Spiral tool is grouped with polygon and graph paper tool. The property of Spiral tool in the property inspector include Spiral Revolutions, Symmetrical modes, Logarithmic mode, and a Spiral expansion slider


By default, all new spiral objects are set Symmetrical. A Symmetrical spiral object is evenly spaced, where as Logarithmic spirals expands with increasingly larger distances between revolutions.


* GRAPH PAPER TOOL

The Graph paper tool is used to draw grids and set the number of rows and columns. A grid is a grouped set of rectangles that you can break apart. The properties of these tool share the Property bar space with Spiral tool properties and allow setting the number of rows and columns for a new graph paper object.


These all are the basic shaped in CorelDRAW. All the tool which you can seen above are commonly used in all works with different situations.

PREDEFINED SHAPES

Using the Perfect Shapes collection. predefined shapes are drawn. Predefined shapes are basically divided in to five categorized shape areas : Basic shapes, Arrows, Flowchart, Stars and Callouts . Perfect shapes are objects composed of one ore more control points called glyph nodes. These nodes enable you to edit a a specific part of the shape dynamically, according to the shape's design.
When the Basic shape tool is selected, the property bar displays various options such as Perfect Shapes, Outline Style Selector, Warp photograph text and so on.

CorelDRAW


CorelDRAW is a comprehensive ensemble designed to meet all creative needs. This software is specifically designed to create illustrations. It simplifies the complex task of graphics by providing powerful tools to streamline the process of creating , editing and reusing graphics.

CorelDRAW is an easy-to-master , exceptionally powerful program with a tool-set that will help create innumerable creative illustrations and a simple , yet well structured , interface.

The different parts of the application window are as follows :

* Title bar
* Menu bar
* Tool bar
* Property bar
* Rulers
* Toolbox
* Drawing window
* Drawing page
* Color palette
* Docker
* Status bar
* Document navigator
* Navigator

 The title bar displays the title of the currently opened drawing window.The menu bar contains the pull-down menu options. The tool bar contains menu shortcuts and other commands. The standard toolbar contains various options like , New , Open , Save , Print and so on. In addition to these , CorelDRAW has tool bars for specific kinds of tasks. The property bar contains commands or options related to the active tool or object. For example, when the zoom tool is active, the property bar displays the options such as zoom level, zoom in and zoom out to change the view of a drawing. Then the rulers are horizontal and vertical borders used to determine the size and position of the objects in a drawing. The toolbox contains tools for creating , filling and modifying objects in the drawing. The pick tool is selected by default. there are different types of tools. On holding the mouse pointer over the tools, their names and shortcut keys are depicted. The drawing window is the area outside the drawing page bordered by scroll bars and application controls. More than one drawing windows can be opened at a time, but commands can be applied only to the active drawing window. Drawing page is the rectangular area inside the drawing window. It is the printable part of your work area. Then the color palette contains the color swatches. The docker is a window containing available commands and settings relevant to a specific tool or task. The status bar contains information about object properties such as type, size, color, fill and resolution. The status bar also shows the current mouse position. The document navigator contains controls for moving between pages and adding pages. The navigator is a button at the lower right corner that opens a smaller display to help you move around a drawing.These all are the fundamental basics of CorelDRAW.